Taken from AWRI eBulletin - Agrochemical update 02 July 2026. APVMA Final Review: Impact on Winegrape Vineyards The wine industry has ruled that vineyard use of paraquat, diquat, and paraquat/diquat combination products is no longer supported, effective 23 June 2026.Key dates:23 June 2026 — decision...
On This Page
1
Open My Spray Records page
2
Create your Spray Record
3
Enter the Spray Date
4
Enter the Spray Dates
5
Add Pests/Diseases/Targets & Chemicals
6
Apply the Application Quantities
7
Select the Weather, Equipment, and Operator
8
Add Notes and Declare your Spray
1
Open My Spray Records page
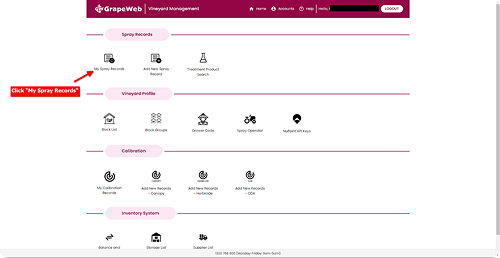
From the vineyard management, find the My Spray Records tile on the Spray Record section.
What To Do
4 actions
01
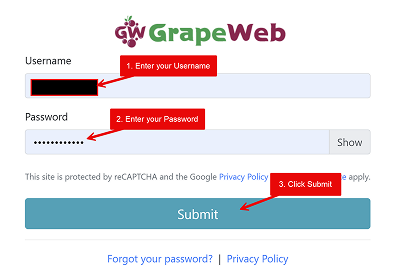
Log in to GrapeWeb by entering your username and password.
02
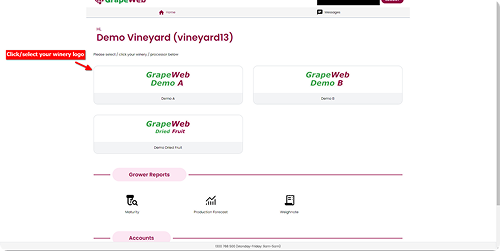
Wait for the Home page to appear, then select your winery/processor (click on your winery/processor logo).
03
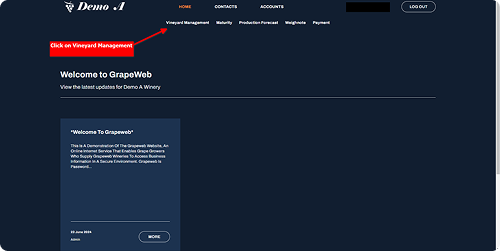
Wait for your Winery Page to appear, then click on the Vineyard Management menu.
04
Look for the Spray Records section, then click My Spray Records icon.
Step 1 · Click image to zoom
2
Create your Spray Record
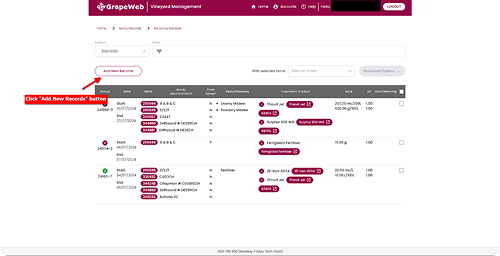
On the Spray Records page, kick off a new entry with the orange button.
What To Do
3 actions
01
Confirm you're on the My Spray Records page (notice breadcrumb at top).
02
Click the Add New Records button — a 6-step wizard opens.
03
The 6-step wizard opens. The first step is Spray Dates.
Step 2 · Click image to zoom
3
Enter the Spray Date
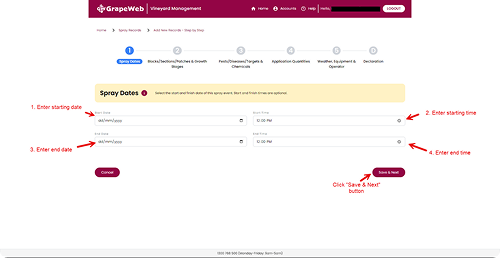
Pick the date the spray was (or will be) applied. Time is optional but useful for re-entry intervals.
What To Do
5 actions
01
Click the Start Date field and select the starting date.
02
Click the Start Time field to set a time (Optional).
03
Click the End Date field and select the end date.
04
Click the End Time field to end a time (Optional).
05
Click Save & Next to continue to Blocks/Sections/Patches & Growth Stages.
Planning Ahead?
- Entering a future date creates a Planned Spray. It cannot be declared as completed until the start date arrives.
Step 3 · Click image to zoom
4
Select Blocks/Sections/Patches & Growth Stages.
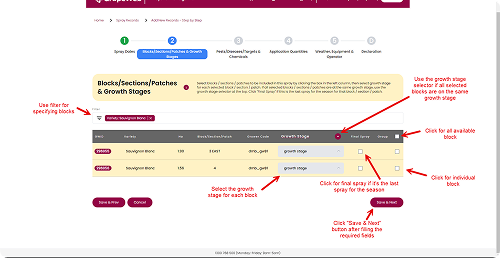
Tick each block/section/patch included in the spray, then choose its growth stage from the dropdown.
What To Do
5 actions
01
For individual block/section/patch you want to include, tick the checkbox on the most right column.
02
Click the Growth Stage tab for that block/section/patch and pick the phase.
03
If all selected blocks/section/patches share one growth stage, use the bulk selector at the top of the column instead.
04
Tick the checkbox for Final Spray if its the last spray for the season.
05
Click Save & Next to continue to Pests/Diseases/Targets & Chemicals.
Bulk-select & filtering tips.
- Click the checkbox in the most right table heading to select every block/section/patch at once.
- Apply Filter to narrow blocks/section/patches by specific options first.
Step 4 · Click image to zoom
5
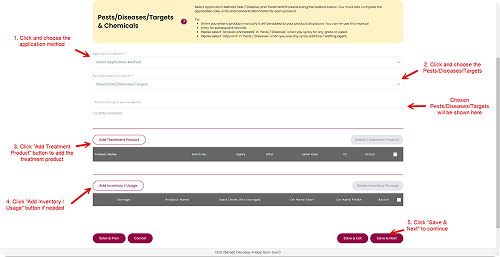
Add Pests/Diseases/Targets & Chemicals
Add what you're treating (pests/diseases/targets) and the treatment product applied. You can add as many of each as needed.
What To Do
6 actions
01
Click Application Method and choose the application method.
02
Click Pests/Diseases/Targets and choose what you're treating — you can add multiple targets at once. The chosen pests/diseases/targets will be displayed below it.
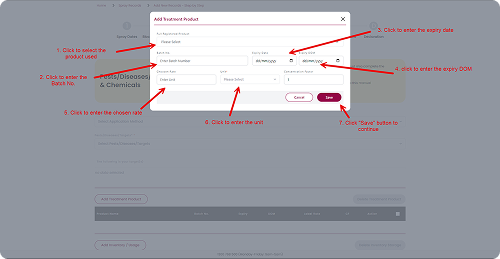
03
Click Add Treatment Product and pick the product, then enter the batch number, expiry & manufactured dates, rate, units, and concentration factor — add products individually to ensure accuracy.
04
Click Add Inventory/Usage if needed.
05
Repeat as needed — multiple pests/diseases/targets and treatment products can be added to the same record.
06
Click Save & Next to continue to Application Quantities.
Watch the alert/warning banner.
- Alerts/warnings are checked automatically before continuing to Spray Notes.
- You can also use the Check for Alerts button at the bottom to re-verify.
Step 5 · Click image to zoom
6
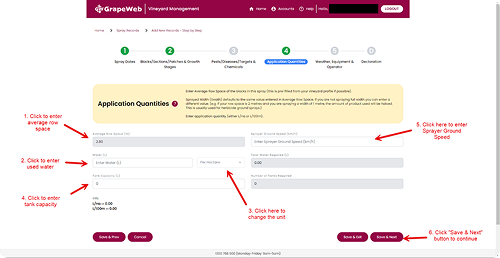
Apply the Application Quantities
Each application method has its own application quantities. The example below is for the Folier/Aerial method.
What To Do
5 actions
01
Enter the Average Row Space.
02
Enter the Water Sprayed (in Litre) figure. You can also change its unit (shown below is per hectare).
03
Enter the Tank Capacity (in Litre).
04
Enter the Sprayer Ground Speed (in km/h)
05
Click Save & Next to continue to Water, Equipment & Operator.
Watch the alert/warning banner.
- Alerts/warnings are checked automatically before continuing to Spray Notes.
- You can also use the Check for Alerts button at the bottom to re-verify.
Step 6 · Click image to zoom
7
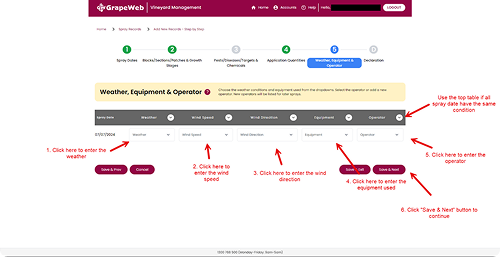
Select the Weather, Equipment, and Operator
For the spray dates (range) you chose, please select the weather, the equipment, and the operator.
What To Do
6 actions
01
Select the Weather.
02
Select the Wind Speed and the Wind Direction.
03
Select the Equipment used for the spray.
04
Select the Operator
05
Use the top table if all the spray date have the same condition.
06
Click Save & Next to continue to Declaration. You will be asked to whether fill in the operator worksheet or to continue to declaration.
New operator?
-
Register them as an operator first — new operators will be listed for later sprays.
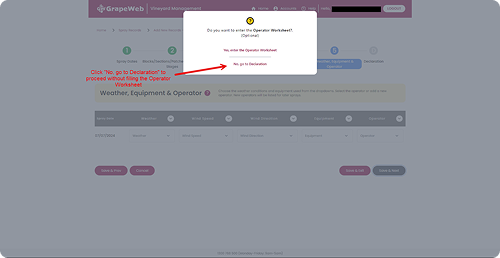
Step 7 · Click image to zoom
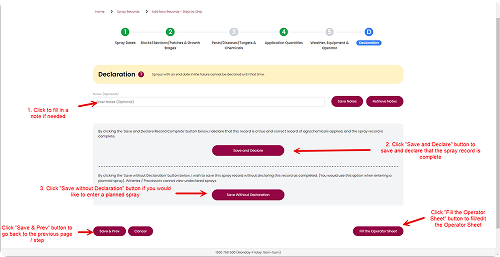
8
Add Notes and Declare your Spray
Drop any additional information — detailing context, observations — then finish the record.
What To Do
4 actions
01
Click the Notes field and type anything worth recording (Optional).
02
Click Save and Declare to confirm that the spray record is finished
03
Click Save without Declaration if you would like to enter this as a planned spray.
04
Your spray record is created 🎉 — you can click Save & Prev to go back to the previous step. You can also fill the Operator Sheet (in case you missed the prompt shown before).
Saving & Retrieving Previous Notes.
- Click Save Note if you want to keep it as a re-usable template.
- Click Retrieve Notes if you want to use previously saved templates.